Quantcast
Channel: The Heralds of Ruin Gaming and Painting Blog Archive
Viewing all 74 articles
Browse latest View live

Getting Started With Marvel Hardcover Collections - A Buyers Guide

$
0
0
A little off-topic for this one, but most of us are like-minded guys so I'm pretty sure this article will be of interest to a few of you!

First, a preamble: I don't claim to be an expert in comics in any shape or form. I read comics when I was kid but they have only recently (last 5 years or so) regained my interest. It has taken me a good few years to get my head around it all, and this article is me sharing what I've found when I restarted my collection. Hopefully it will help someone else out there to understand where to begin their own!

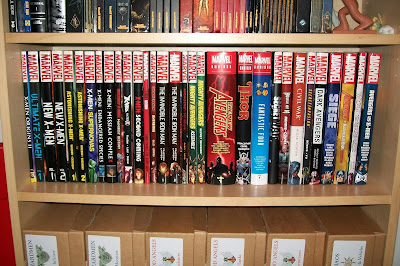
My Marvel Hardcover Shelf... in progress.

Getting Started

So, I decided to start a Marvel graphic novel collection. I found that there are many ways you can do this, the cheapest way would be to go the trade paperback route: these are perfect bound books of about 150 pages (about 5/6 issues). Oversized Hardcovers can vary from 150-500 pages and can collect entire runs of comics - plus they look awesome on the shelf (and can still be fairly cheap from Amazon). Finally, The fairly recent Omnibus range can hit 1500 pages and cost near £100, but are great for collecting single series - especially those of non-modern age.

As I wasn't going to go mad (to start with) I chose to focus on Oversized Hardcovers (OHCs) as these seemed to be the best way of collecting a good looking shelf collection.

Marvel Events

When I first started collected OHCs I focussed on contemporary X-men books. This seemed to be the easiest way to begin as there was a clear-cut reading order. However as I progressed I soon learned that Marvel comics do not have a clear reading order! Their yearly 'events' interweave with the rest of the series', and storylines in those series' become incomprehensible unless you read the event 'mini-series' first...

So in the end I gave up on X-men and read the most recent events in order. According to the web its best to start at around 2004 and work from there, as it was at that point where Marvel events really started to affect continuity. There have been loads of events (including lots of 'cosmic' ones that don't really affect the continuity of the 'earth-based' ones), so I tried to figure out the key ones before planning my purchases:

2004-05: Secret War - OHC Link TBP Link
This is a nice tidy event where Nick Fury rounds up a bunch of heroes and invades Latvaria (Dr Doom's kingdom). Although fairly simple, it actually has the beginnings of story threads that only come to fruition many years later. It also acts as a great introduction to the main Marvel characters (especially if you've just started collecting), as most are present in some way during this event.

2005-06: House of M - OHC Link TPB Link
No More Mutants. Pretty much mandatory if you're thinking of starting an X-men collection as its repercussions reverberate through a decades worth of storylines. It's also a must if you're following the Scarlet Witch storyline.

2006-07: Civil War - OHC Link TPB Link
Civil War is an epic event where the mighty heroes of earth are split down the middle, fighting each other over the Superhuman Registration Act, and ends in a surprising death. Although the main mini-series if quite short, this event plays out more in the Avengers comics, which is why I also recommend getting this book as a companion.

2008: Secret Invasion - OHC LinkTPB Link
The Skrull alien race infiltrates earth and imposes as their most loved heroes. The beginnings of this event took place during the Secret War and through the (mostly) Avengers comics since then. Some cool twists and turns in this book. The Mighty Avengers: Secret Invasion book ties up loads of lose ends as well.

2009: Dark Reign
As a result of the Secret Invasion Norman Osborn (The Green Goblin) becomes director of SHIELD and replaces the Avengers with his own, less savoury, team. There isn't actually an 'event' book as such for this one, but the best compilation of Dark Reign is the Dark Avengers book which takes place neatly between Secret Invasion and Siege. Speaking of which...

2009-10: Siege - OHC LinkTPB Link
Siege is the culmination of the Civil War/Secret Invasion/Dark Reign storyline in an epic finale! To get the most out of this you'll need to grab the Thor (Straczynski) omnibus, as it explains why Asgard is in Oklahoma. The end of Siege then follows straight into...

2010: The Heroic Age - OHC Link
After Siege the 'big three' Iron Man, Cap America and Thor become best buds (well not quite) again after years of fighting. I assume due to the success of The Avengers movie! :-P.

Interlude
There are quite a few 'mini-events' that take place here. Including Chaos War and Children Crusade. Honestly you don't really need them for continuity's sake. The Children Crusade is actually really good though, and explains Scarlet Witch's re-emergence and basically sets up Avengers vs. X-Men. Fear Itself also takes place here (a pretty big event) but isn't available in OHC and apparently wasn't that good.

2012: Avengers vs. X-Men - OHC LinkTPB Link
This is actually best read AFTER you've read the X-men books to be honest (see below), as it focusses a lot on Hope's storyline as well as understanding what Utopia is.

And that's you up to date! You can of course also grab the 2013 event Age of Ultron, but it's a pretty standalone event.

Character Series OHC/Omnibus List (2004+)

Now you've got all the recent events out the way, you should be looking at collecting your favourite character series! Honestly it doesn't matter what order you read these in, especially if you've read all the events above.

I'm sticking to the OHC and Omnibus collections that take place during the 2004+ era with my collection (so they coincide with the events I've also collected), so I'll focus on them here and try and explain where each book fits in the Marvel timeline. There are lots more books that cover the earlier years but you'll have to look elsewhere for where to start with them!

Iron Man
Iron Man Extremis (before Civil War - a cool story that defines the modern Iron Man)
Invincible Iron Man vol 1 and vol 2 (during the Dark Reign, Siege and well into the Heroic Age)

Captain America
These take place directly after one another:
Captain America (Brubaker) Omnibus (before Civil War)
The Death Of Captain America Omnibus (spoiler much! after Civil War, during Secret Invasion)
Captain America Lives! Omnibus (during Dark Reign)

Thor
Thor (Straczynski) Omnibus (pretty much sets up the Siege event)

Fantastic Four
Fantastic Four (Hickman) Omnibus vol 1 (during the Dark Reign)

New Avengers
This is a tricky one, as the first 3 volumes of the OHC are now collected in an Omnibus but the others are yet to be! I would assume the last 4 OHCs will be in a vol 2 at some point...
New Avengers Omnibus vol 1 (starts before House of M, ends with Secret Invasion)
New Avengers Omnibus vol 2 (between Secret Invasion and Siege - yet to be released)

Mighty Avengers
A new Avengers team created by Iron Man after the events of Civil War, runs parallel and ends at the same point as the New Avengers above).
Mighty Avengers: Assemble
Mighty Avengers: Secret Invasion
Mighty Avengers: Dark Reign

Hulk
Hulk doesn't really feature that heavily in Marvel events for some reason, but he did have his own event in 2006 with the amazing Planet Hulk/World War Hulk storyline.
Planet Hulk
World War Hulk

Others
Secret Warriors Omnibus (takes place during Dark Reign, a great 'spy' book)
Dark Avengers (basically the Dark Reign event book)

X-men
The X-men arc between House of M and AvX is epic (with many, many books), so I've just included the important books in the storyline:
New X-Men (Morrison) Omnibus (although older than 2004, this is great starting point to modern X-men)
Astonishing X-Men (Joss Whedon) Omnibus
House of M (the event - see above)
Endangered Species
Messiah Complex
Manifest Destiny
Utopia (takes place during Dark Reign and features the Dark Avengers)
Nation X
Messiah War
Second Coming
Schism
If you grab Children Crusade this will lead you nicely into the Avengers vs. X-Men event.

The End

I know this article has been a bit waffly, but I hope it has helped at least one person out there to make sense of the minefield that is modern Marvel!

Note that there are always new books coming out, so this article will go out of date pretty quickly. The best place I can suggest to visit for your Marvel OHC/Omnibus news and help is this forum.

If I've missed anything or made an error leave a comment below!

Darth Meer

What a difference 5 years painting makes!

$
0
0
What a difference 5 years makes to your painting! The model on the left is from 2008 (I was 21, fresh from uni), the model on the right is one I've just painted - although I've yet to apply transfers.


If you need proof that practice makes perfect, here is is.

Blood Angels painting tutorial coming soon :-D

Darth Meer

Blood Angels Honour Guard Kit Bash

$
0
0
I received a few sets of the new marine boxes over Christmas, and as I didn't really need a Sternguard squad I though I'd kit bash it up and build myself a proper traditional Honour Guard for my Blood Angels (i.e. one with all the trimmings, not just 4 special weapons).

Blood Angels Honour Guard Kit Bash

I've used a combination of Sternguard, Vanguard, Sanguinary Guard, Death Company and a few bits from my bits box with these models. I've purposefully gave them static poses to match with the plastic Chaplain and Librarian models (which I also received for Christmas and will be building soon!) The heads are blu-taced on at the moment, as i want to spray/paint these separately (being gold and all).

I've also built up a Vanguard and Sanguinary Guard squad too. Used both of them in my last game and they actually did fairly well, even against my friends Iron Warrior Terminator list... The Vanguard Vets survived a crash and burn from the Stormraven thanks to their fancy storm shields.


Can't wait to paint these up!

HoR Kill Team Update

$
0
0
It's been a while since I posted a Kill Team update on this blog, but don't worry the HoR snotlings and Kill Team community have been fervently tweaking the rules and team lists for your enjoyment.


A Name Change (well, tweak)
What's in a name? Well apparently lots of confusion. People have been getting mixed up between our version of Kill Team and the newly released Kill Team digital rules by GW. I won't go into which is superior (I'll leave that to the loyal members of our Facebook group) but it has become apparent that we need to distinguish ourselves a little. From this point forward we will reference our popular, unofficial ruleset as 'HoR Kill Team'. It's only a little tweak, but may save some confusion.

HoR Kill Team Rules v2.1
Although the sweeping changes to the HoR Kill Team rules have finally been ironed out, the core rules has seen a few tweaks (and a style change) since the last KT update I posted, especially within the mission rules. Most of the team lists have also had a large update in the last few months to bring them up to date, so if you haven't checked them out in a while you can grab the latest version of the rules and team lists here.

The HoR Kill Team Facebook Group
As always, your one-stop-shop for HoR Kill Team news, feedback and questions is the HoR Kill Team Facebook group, which you can visit here. Our numbers have grown to over 500 now so join in the discussion and share some photos of your team!


Here are a few of the photos the community has shared with us during the past year to wet your appetite:

Photo by Jeffrey Rademakers
Photo by Markus Kuttelwascher
Photo by Joshua Edward Collins
Photo by Jared Swenson
Photo by David Martin
Photo by Maciej Kaminski
Photo by Luigi Accardo
Photo by Damiano Garonzi

Painting Blood Angels Tactical Squad Tutorial

$
0
0
This Blood Angels painting tutorial is based off of my new, darker, colour scheme (although it's not too dark - they're still 'bangles' after all!). You had a taster of my next generation BA army with the Scouts, well here is a fully blown Blood Angels Tactical Squad. Sorry about lack of detail in the photos, I desperately need a new camera!

Blood Angels Tactical Squad

I don't confess to be an expert on painting, but I hope this little tutorial will help a few people get started without the experimentation I had to do first. I've tried to write this for beginners, but assume basic knowledge of painting (i.e. you know how to highlight, what a wash is, etc).

What you will need if you want to follow this tutorial exactly (although you don't have to follow my method to the letter if you don't have all the paints):

  • Models (duh)
  • Chaos Black spray
  • Mephiston Red spray
  • Base: Mephiston Red
  • Base: Mechanicus Standard Grey
  • Base: Leadbelcher
  • Base: Rakarth Flesh
  • Base: Zandri Dust
  • Base: Averland Sunset
  • Base: Abaddon Black
  • Base: Steel Legion Drab
  • Base: Warplock Bronze
  • Layer: Warpstone Glow
  • Layer: Moot Gren
  • Layer: Evil Sunz Scarlet
  • Layer: Wild Rider Red
  • Layer: Runefang Steel
  • Layer: Ushabti Bone
  • Layer: Flash Gitz Yellow
  • Layer: Dawnstone
  • Layer: Pallid Wych Flesh
  • Layer: Gehenna's Gold
  • Layer: Auric Armour Gold
  • Shade: Carroburg Crimson
  • Shade: Nuln Oil
  • Shade: Seraphim Sepia
  • Shade: Biel-tan Green
  • Shade: Agrax Earthshade
  • Shade: Reikland Fleshshade
  • Technical: Lahmian Medium
  • Transfers
  • A refreshing beer


Step 0: Construction
You know what to do here, but I just wanted to interject and say its really useful (especially if you're spraying the basecoat) to leave the boltguns detached. Leave the guns on their sprue if you want an easy time with painting too, although you should chop at least one out to use as a guide when assembling. It's useful to cut out the bits highlighted yellow in the image below before you undercoat the sprue, this will give you only two points (one of which will be covered up anyway) to touch up.

Boltgun sprue - bits to chop out.

Step 1: Undercoat and Basecoat

The easy bit, spray Chaos Black and leave to dry for ages. Spray Mephiston Red. These coats need to be really light, and make sure you hold the can more than 30cm away to prevent bobbling or it going on too thick (the red spray is especially touchy). Make sure the black is completely dry before you move on to the red.


Step 2: Base Colours and Washes

Wash the entire model with Carroburg Crimson and wait for it to completely dry. Paint the armour joints and chest eagle Mechanicus Standard Grey, and metal bits Leadbelcher. Wash both of these colours with Nuln Oil. Now you need to do the base and wash for the following things:

  • Parchment/Cloth: base Rakarth Flesh then wash with Seraphim Sepia.
  • Skulls: base Zandri Dust then wash with Seraphim Sepia.
  • Wax/Eyes/Plasma: base Warpstone Glow then wash with Biel-tan Green.
  • Gold: base Warplock Bronze followed by Gehenna's Gold then wash with Reikland Fleshshade.

Try and be neat with these but if you slip don't worry as we'll be touching them up.


Step 3: Basing

It may seem weird to be basing your model at this stage, but I've found you can get a much better drybrush if you don't have to worry about ruining your paint work, and you'll be touching up stray brush strokes in the next step anyway. Different people have different ways of basing, but for these models I've gone with a 'dead ash world' style. Water down some PVA and paint it onto the base. Dip the model in sand and leave it to dry for a few hours. Wash the sand with Nuln Oil, this also helps it stick. Once the wash is completely dry heavy drybrush Rakarth Flesh over the sand, then a very light drybrush of Pallid Wych Flesh.


Step 4: Layer Colours

Layer on Mephiston Red (water it down!), leaving the recesses and bits no one is going to see anyway. Layer the base colour back over the bits you washed in Step 2, leaving the recesses:

  • Parchment/Cloth: Rakarth Flesh.
  • Skulls: Zandri Dust.
  • Wax/Eyes/Plasma: Warpstone Glow.
  • Gold: Gehenna's Gold.


Step 5: Highlights

The time consuming step, but arguably the most important as it just makes your painting more 'real'. Highlight the edges of the red with Evil Sunz Scarlet. Have a beer (maybe a nap) to help reduce the pain of RSI. Then highlight just the corners with Wild Rider Red (this makes the armour pop). Then highlight the following:
  • Grey: Mechanicus Standard Grey.
  • Metal: Runefang Steel.
  • Parchment/Cloth: Pallid Wych Flesh.
  • Skulls: Ushabti Bone.
  • Wax/Eyes/Plasma: Moot Green.
  • Gold: Auric Armour Gold.


Step 6: Squad Markings (optional)

It depends on how you want to paint your squad, but I've chosen to detail squad markings on the knees in accordance with the BA codex. The pad is painted with watered down Averland Sunset and given a highlight of Flash Gitz Yellow. I've also used these colours to paint the blood drops on my Sergeant. The blood drop on the knee is Mephiston Red with a slight Evil Sunz Scarlet fleck. A good trick to painting blood drops is to paint an upside down cross, connect the tips, then fill it in.


Step 7: Boltguns

With the main model mostly done it's time to paint the weapons! Base the gun with Leadbelcher and give it a wash of Nuln Oil. Paint the 'case' of the gun with Abaddon Black. Highlight the metal with Runefang Steel and the black with Mechanicus Standard Grey. Finally, give the black corners a highlight of Dawnstone. Paint the rest of the gun (i.e. the hand and any skulls/purity seals) with the same colours you did in previous steps. Once your guns are dry, chop them out the sprue and tidy up the barrel end with Leadbelcher (or drill it out like I've done). Give the wrist a drop of super glue and stick it to the model.


Step 8 Transfers

My previous Blood Angels used sculpted metal pads, but as I didn't fancy the idea of the new finecast version (and didn't want to fork out £11.50 for a single squad's shoulder pads) I opted for transfers. I've heard great things about Microsol when working with transfers but I ended up trying the simple GW method.

Cut around the transfer as close as you can with a knife, leave to soak for 30 seconds then brush off the baking paper on to the shoulder pad. Once the transfers are dry, paint over them with a layer of Lahmian Medium to bring the gloss down and keep them stuck. Touch up the areas around the transfers with Mephiston Red. I also like to add 'battle damage' to the transfers to blend them in (see the second image below especially).


Step 9: Celebrate!

Finally, give the base rim a few coats of Steel Legion Drab. Pop the cork on a bottle of bubbly and wish yourselves well done!

Blood Angels Tactical Squad - FINISHED!

Sergeant Armand

If you found this tutorial helpful (or incomprehensible) leave a comment below!

Darth Meer

HoR Kill Team for 7th Edition Update

$
0
0

It's been a busy week since 7th edition Warhammer 40k, but with some help from the HoR Kill Team community we've finally managed to release our update.

You can find all the HoR Kill Team documents here.

Instead of simply fitting the existing rules to 7th edition we stepped back and took a major look at our current rules (then v2.1). It's obvious that the current missions weren't working as well as they should, so they've been totally redesigned. Doing away with VPs altogether, the missions have been cleaned up and brought in to line with the 40k standard way of showcasing missions (with a few HoR Kill Team tweaks of course).

The Psychic phase was an issue for a while, but in playtesting we found the simplest way of limiting powers was to basically half the number of warp charge available. Most teams will only have a single psyker with a single power anyway, so it seemed fitting. HoR Kill Team is not about psyker domination, it's about a strike team. Psyker's can still play a part, but not take over.

HoR Kill Team v3.0 changes include:

  • Clearer format.
  • General tidy up.
  • The Rout Test replaces the Run Away! rules.
  • Team Leaders no longer get Precision Shot.
  • References to area terrain removed.
  • Jumping/climbing now includes consolidation and run moves.
  • Hiding spot distance has increased to 12".
  • Squads may now hide.
  • Entire Psyhic Phase section.
  • Added LoS clarification.
  • Gets Hot rules clarified.
  • Flamer rules clarified and no longer causes movement penalties. Models that start their turn in b2b can now catch fire too.
  • Assault result rules now have additional modifiers, including 'banners' (those back banners on sergeants matter now!)
  • Squad rules tidied up and clarified including rules on Overwatch and Pinning.
  • Added note to optional Injury rules to clarify that models are not casualties if they are knocked down or stunned.
  • Entire Mission section has been re-written, with 6 (almost) new missions.


Also updated are the Space Marine, Black Templars (an expansion list), and Grey Knights team lists. Not much has changed in the Space Marine team list as it was mostly a test for the new v3 formatting, but the Grey Knights one has some major differences - so take a look!

More Kill Team 7th edition updates to come!

Changes changes changes...

$
0
0
For the long time fans, and all the new ones you'll have noticed plenty of updates in the last few days.

Tom Meer and co have turned over the rules to myself and some other dedicated folks. We thank them for everything they have done, laying the groundwork for this great system.


So far, we have uploaded plenty of new draft rules, a draft Spanish version of the rules, and plenty more.


Keep your eyes peeled as we keep up this pace! Share these rules with your friends and join us on the FB group for feedback!

The Legacy...and the file to go with it

$
0
0
Just added a new page, and this will contain all the Legacy files that were updated at the end of 6th/start of 7th edition.  When we update the main rules, I will transfer over those as well.

Happy hunting out there!

Article 1

$
0
0
Long time, no post!  The army lists are still being looked over, developed, and some new ones added...The Hrud!!!  Skaven in Space...look forward to seeing what they come up with.  But the reason for this post is coming up next.........

Check it out!  Miniwargamins just did a huuuuge HoR Kill Team Campaign.  Awesome videos, awesome rules, and just enjoyable to watch.

Markerlight #1: Marco Andrä

$
0
0
Heralds of Ruin, much like a warband of Bezerkers, is all about the community. Without the playing, photographing, arguing and enthusiasm this game would be nowhere. I wanted to give some of the members their chance in the spotlight (a risky prospect in wartime, I'll grant you) and plenty of volunteers stepped up.


First in the line of fire is Marco Andrä, better known to most of you as "Marco with the amazing Arbites"! Go crazy! Raise the roof! Now calm down, citizen, or I'll let this cybermastiff loose on you.

I like to think his name is Rover, short for Land Rover, nickname for Land Raider, because he absolutely will kill you.

Marco's been in the wargaming game since 1997, which is roughly when 2016's average GW customer learned to walk, so I'm looking forward to getting some pearls of wisdom from this space cop. I get one straight away: his kids, 3 years and 12 weeks old are too young for 40k. Noted. My heart is breaking for the first time either of those children get their hands on a paintbrush, mostly because I know they'll be better than me immediately.

On the hunt for Bill Posters

A combination of a love for Necromunda in the early days and a strong 40k gaming group in the area led Marco pretty directly to a Heralds career in the Arbites. I sense a soft spot for the "little guy" armies that don't see much love from the corporation. In the ever-increasing grimdark, the space police force might seem less and less relevant, but they're unsung heroes in the finest Heralds of Ruin tradition. They quash planetary rebellions, daemon incursions and cult cells before anyone ever gets to hear about them. I think they even managed to get Ghazghkull on a tax avoidance charge. And even if they are utterly corrupt, who isn't in the 41st millenium?

No way he could afford that helmet on his pay, know what I mean?


With fingers in many Imperial pies, Marco's also building Inquisition and Rogue Trader teams, and plans a Sororitas team in future. This sounds like nothing short of a takeover bid to me, and I for one can't wait to see them. Just as I'm ready to accuse him of being a total Faction Hipster, he lets slip that he's got a neat 5000 points of Imperial Fists too, an entire battle company! No shying away from the poster boys either, then.

His firm favourites, these Arbites are another product of the hobby's mostly-wonderful community. Trading groups online and mates with spares made it easy to expand the Necromunda squad into a fully fledged kill team. But are they good at their job?

They really take a hard line on flyposting, that's for sure.


Long story short, we'll have to wait and see! The Legacy list and the Ready To Test edition of the Arbites in HoR will both be getting put through their paces in a campaign starting soon against a whole bunch of Tau, a whole mob of orks and some mechanicum robots, below, who you might recognise from the group.


The Dead Saints March. Does nothing dead just stay dead anymore?


The boys in blue and white are going to have their hands full... In the campaign runner's words:

For 500 years, the savage ork clans – remnants of the great Waaagh Ukkuzargk – have battled each other brutally in territorial wars, isolated on Vulga Magnas Sub-continent of Simperia. Once wholly covered by the elegant spires and domes of the hive city Dagon I, Simperia lies in overgrown ruins since it´s deliberate obliteration by the planetary governor as a last attempt to halt the unstoppable Ork invasion. Prowled by shadows, mutants, seekers of lost relics and darker, deeper things, the vast remains of Dagon I have acted as a natural barrier between it´s greenskinned inhabitants and the passage to the outskirts of Dagon II. Now, singular sighting of ork parties near the parvelian gateway have been reported to the local administoria securita by scouting teams and passed on with great concern to the Arbitrary advisors. Investigations have been called for... 


Marco and Paul the rusty robot king have a Facebook page between them, Minimoped, which you should absolutely check out here for progress on the various stunning Kill Teams and others that Marco, Paul and Wolfgang are working on. Paul is also the mastermind behind the Vulga Magnas campaign and you can find his blog here. 


To wrap up, we've got some painting secrets from Marco that have been released on top level security. If you read them more than once, the Inquisition will come and turn you into a servo-skull and 10 cubic cm of fertiliser. Best presented in his own words, I wanted to know how his white armour comes out so damn crisp every time:

First of all, I don't thin my paints! My white is usually just white primer with a wash, in case of the Arbites a warm brown, (GW) agrax earthshade. Then the gw white comes really thin out of the pod, so you need maybe three layers to build up to pure white. I don't like a clean look on my minis so the white is always a shade of some grey or brown, just some small areas are really pure white.
Now you can do it too... probably...


And does he have any tips for an aspiring champion of paint? How about some wisdom to help us mediocre painters get a glimpse of the top? 

[Levelling up your painting] is not so easy for me. I painted 5000 points of imperial fists and did not improve my skill like I did with 10 different models for my killteams. Try something different. Don't always use the same way to start a mini. Batch painting does not improve anything, that's my tip. If you want to paint a big army you have to, sure, but if you want to improve try different techniques, colours, and tools. and of course: listen to Duncan and thin your paints!! 

Or we'll thin them for you, Bill!

Big thanks to Marco for taking the time to talk to us, and especially for being the first Markerlight victim. Cheers and good luck keeping the peace!


The trading groups that supplied the Arbites are this one and this one.


If you'd like to be featured in a future Markerlight here at Heralds of Ruin, or know someone who should be, let us know in the comments, tell Ash about it on facebook or bring it up in the forum at HERALDSOFRUIN.COM/FORUM !


Do it.

Competition time!

$
0
0
In the grim darkness of the 41st Millenium, there are only prizes.

As you probably know, we're busy testing our newly updated Kill Team Lists. We set ourselves the initial target of 100 battle reports to gather a decent amount of data on the way they play. Now we need your help!

Or whoever.


Our (usually) benevolent forum overlord is holding a BatRepRaffle to speed things up.The prize is a £25 Games Workshop voucher, or equivalent in whatever currency you jam in.
One battle report gets you one entry to the raffle. Ten gets you ten. It should be obvious by now what to do!

Blanche knows. Get writing!


Head here to our Playtest Board for an idea of what a battle report should look like, and also the place to post your own.

Remember, if the contest doesn't get 30 submitted reports, NOBODY WINS. Just like in war.

It's just a senseless waste of human endeavour. Like this terrible misallocation of Google Glass 2.

Don't be fooled by the [#numbers] either. That's the count since we first started testing!

Any thoughts on what you can get with £25? I'd suggest splitting it with your opponent, since it takes two to play a game, but the prize goes to the submitting member!

You can check this useful topic for first-time Kill Teamers and get half off your chosen Start Collecting box. That's where I'd go.

GO!

8th Edition...

$
0
0
I know many people have questions on a timeline for a switch to 8th edition, but please be patient with us.  We would like to finish up the 7th edition rewrite, finalize everything, and then watch how 8th plays out in the world.

So we appreciate everyone bearing with us, and look forward to playing some HoR with you!

Scrutinising the Inscrutable

$
0
0
Welcome, Heralds, to Volume I of our (as yet unnamed) tactica collection. We'll probably end up calling it something stupid like Steel Brain.

I thought I'd start with something really niche and optional. You know, the important stuff. Specifically the new Inscrutable Objectives table which, if used correctly, can bring some properly weird superpowers to the game.

You can choose to use these thesaurus-powered Mysterious Objectives in any game of Heralds, as long as it uses objectives of some kind. In this article we'll look at some quick DO and DON'Ts, and leave you to figure the rest out on your own.

Objective Duality

As in previous editions, there are two kinds of objective in H8R: the ones you can pick up and carry, and the ones you just have to stand near. This makes a clear difference to their utility: is it good (or bad) for several models or just one? For the portable ones, you get the extra advantage of being able to take it to where it'll do the most good. For the static kind, you might be able to maximise or minimise their area of effect by placing your models closer or further away.

1. Mundane: No Effect 

Booo, right? Booo for Boooring.
Still though, it's worth thinking about. This won't help you at all, it's just more likely to get you killed since the enemy wants it too.

DO:

Give the portable version to someone who you don't mind Hiding. They'll be able to keep hold of it a lot more easily, and if they're no great shakes in the fight, you won't miss them.

Send someone worth their salt after the static version. Someone who doesn't need buffs to win a tussle. Consider reinforcing it with the Immovable Object action.

That's it. You know how to hold objectives, and we've got more interesting things to talk about.

2. Fury Siphon AKA "Come At Me, Bro!"

Your Team Leader gets to swap their Leadership and Attacks stats - for the rest of the game. You know when you get so hungry that you become extremely stupid and angry? It's that. They can only reverse the change by using a different Fury Siphon. 

DO:

Give this to your Leader. Obviously! Nobody else can benefit from it, so you might as well have the option.

Try your best to snipe the enemy leader if they spot it first and are closer to it than you. Really ruin their day.

Start killing enemy grunts as fast as you can if the enemy leader gets their forelimbs on it. You want to make them take a Rout test on that new Leadership value, which is probably around 4 if they're lucky.

DON'T:

Use this if you're approaching Rout territory! Unless you can immediately get a charge off, which could well tip the odds back in your favour.

Let the enemy TL take this off the cooling corpse of your flimsy boss. Your average Shas'ui isn't going to benefit much from this, but if that Howling Banshee Exarch gets hold of it, you'll be putting yourself back together with Blu-tack. Faced with that kind of matchup, you'd be better letting someone bigger and tougher keep hold of it, even though they can't use it.

3. Corrupted Waystone AKA "Screw you, Nerd."

Everyone is rightly afraid of psykers, but fear not less! The Corrupted Waystone is here to help. Even the lowliest of psychically-unreceptive morons can deny brain-bullets with this on side, and used properly it can be a serious threat to enemy psykers and their teams.

DO:

Keep your own psykers well away from this! Also laugh with glee if you didn't bring any and your opponent did.

Use a static one as a miniature psychic null zone.  Hold with multiple models, as far from it as you can, for maximum reach. Even if the enemy does the smart thing and keeps their psyker out of the bubble, you're doing board control! Well done!

Chase enemy psykers around with the pocket-sized one. They'll think twice about trying to Smite you if they're worrying about dragging half their team into hell.

DON'T:

Let your psyker near it. Not only is it dangerous but, if your normal less psychically-attuned models are using this to deny enemy powers, your actual psykers can be elsewhere, doing the same thing.

Get too close to an enemy psyker that you're tormenting. If that librarian goes nuclear, you want his teammates to be taking the brunt of his foolishness, not yourself.

4. Decaying Containment Field AKA "Muahaha... I'm invincible!"

An invulnerable save that gets worse every turn? This will be much more useful to some teams than others, but always ends up the same way - getting you and your false sense of security killed off.

DON'T:

Overreact. If the enemy gets their hands on this, don't go panicking and wasting your big guns on them. Anything that their new invul can soak up better than their armour could is wasted. Hit them with small arms fire or, if at all possible, just ignore them for a couple of turns while the save gets worse and worse.

Waste time playing "hot potato." I wouldn't spend turns getting it into the hands that need it most, unless it's super convenient to do so. Just position the bearer so your opponent will have a hard time not choosing them as a Primary Target, and use them as a damage tank for as long as you can.

Assume this will end well.

DO:

Make it a focal area. You want to send everyone who's going anywhere through this point - it'll look like a big, threatening force coming at your opponent, who should react accordingly by wasting a lot of bullets, and by the time the save decays to useless levels, you should be somewhere else!


5. Infra Targeter AKA "HEEERE'S JOHNNY!" 

This one might not seem like the shiniest or most exciting, but hiding is now a useful tactic, which means rooting out skulkers actually matters.

DO:

Think about the model that's hiding. If they're still hidden, but you can see them to shoot at them, it means you can see less than 50% of the model (or they wouldn't be hidden!) That means they're getting a +1 to their Save. Leave them to the big guns; Lascannon Larry and his AP -4 doesn't care what you're hiding behind.

DON'T:

Get excited at the opportunity and put Lascannon Larry in unnecessary danger. To use this most effectively you might have to do some Hiding yourself, just to get into position. That's alright though: what are they going to do, shoot at you?

6. Temporal Disruption Node AKA A glitch in the glitch in the glitch in the...

Let's do the time warp! Shoot or Fight twice; but risk a mortal wound in the process. These objectives really give with one hand and grab with the other.

DO:

Have a think about whether fighting or shooting twice is really necessary. Don't risk a mortal wound just to chop that one guardsman into even smaller pieces!

Have a couple of tactical re-rolls left in the tank, just in case.

Combine with the Unstoppable Force action/stratagem to swing twice against a charging enemy before they get to hit you at all! For the low, low price of 3 Tactical Points, you can do this and re-roll the die to avoid that mortal wound.

DON'T:

Try to take one of these off someone in the Fight phase unless you absolutely have no choice, for the reason outlined above. Shoot them. If you're a full close combat team, use overwhelming numbers to bring them down, or just keep out of their way and negate their advantage.

"But what if it's the only objective on the table?!"
That means it's static, and so you can both benefit. You're more than likely going to be the one making the charge, so make it count.

So there you have it! Have fun with the Inscrutable Objectives, and check back soon for something else. No idea what.

I'm definitely calling this feature Steel Brain.

- Ash.

Heralds of Ruin Introduces: The Rak'Gol

$
0
0
Or: Spiky Radioactive Space Lizards.

- Words by Jean-Luc Delaroute.

So here you are, wondering what kill team you're going to take rampaging through 8th edition. You're browsing the list of available factions. There are all the usual suspects... But maybe you want to try a more exotic brew this time? As you ponder, something catches your eye:


They were here all along, and you didn't even know it.

"Rak'Gol? What the hell is a Rak'Gol?"

Rak'Gol in Warhammer 40,000


The Rak'Gol are a minor official species in the Warhammer:40K universe. Their largest appearance, save for short references in other material, was as antagonists in Fantasy Flight Gaming's Rogue Trader RPG. 


If you want to antagonize the Imperium, the Rak'Gol have it all: hailing from the Ghoul Stars on the galactic north-east, they are a xenos species of chaos worshippers who occasionally invade the Imperium and harvest technology. 
The Rak'Gol, as obscure and unknowable as they are, have had their background expanded upon much more than some other alien species, and I invite you to go read Rogue Trader material, Lexicanium, and/or the Warhammer 40K wiki if you want to learn more about their history and lore. Oh, and they look like this:


Cute


Why play a Rak'Gol Kill Team?

You want to try out a faction that is outside the boundaries of 40K's usual themes. You like the Orks for their insane tinkering, but you think even they are too intelligent. You went to Chernobyl for your last vacation, and were disappointed to see the wildlife had not turned into monsters. You don't understand why Komodo Dragons are illegal to keep as pets. Your favorite movie is the Texas Chainsaw Massacre and you wish Firefly had a second season. If you tick more than one of these boxes, you'll fit right in.

Playing a Rak'Gol Kill Team

Pros:
  • Rak'Gol Ambush.
  • High Strength and Toughness.
  • Large selection of melee weapons.
Cons:
  • Terrible at range.
  • Slow.
  • Low model count (unless you gorge on Youth).

Rak'Gol in HoR: Kill Team are all about encircling the foe with powerful infantry. Boasting an impressive WS3+, S4, T5, and at least two attacks on the majority of their models, combined with the ability to "deep strike" their entire roster minus one unit, they can quickly surround and overwhelm key targets in the opposing team and grind them into a paste. Most of their models are even equipped with Rak'Gol Blades, which help the massacre along by letting you re-roll failed Wound rolls against infantry. 

Still, if you really want to tie up a unit in melee, make sure to commit at least a few models: ambushing means you are charging from 9" away, and Rak'Gol that become stranded in the middle of the battlefield are unlikely to survive for very long. Youth are perfect for this task: while the rest of your units either cost a lot of points or require careful planning, Youth are a mass of bodies ready to prove themselves by swarming your enemy and pinning them in place while you position your pieces - and if your team leader is nearby, they even become semi-competent fighters in their own right.

In addition to the ability to ambush their adversaries, the Rak'Gol have another special rule that is present on the majority of their army: Hunting Frenzy. This lets your models occasionally go on a murderous rampage - specifically, when you roll 6s on your Charge rolls. One 6 means the model will make an additional D3 attacks in the following Fight phase, while a lucky double six means the model will also re-roll all failed Hit rolls for these attacks. A lot of Rak'Gol weapons are also radioactive, and, similarly to the Mechanicus' rad weapons, let you do increased damage on rolls of a 6 to wound.

Your leaders are not chumps, either: while they aren't any better at fighting than their rank-and-file counterparts (which is, admittedly, still very good), they have improved armour saves. If you have the points to spare, your team can even be led by a Broodmaster, who will be more than happy to terrorize your enemy with its three wounds and ability to make friendly models re-roll Hit rolls of 1 in melee.


Core models for the Rak'Gol are Youth, Carvers and Marauders: where Youth and Carvers are here to distract the enemy and to scout objectives, Marauders are a tough frontline unit with characteristics comparable to a Space Marine.

Your special models allow you to bring even more brute strength through Renders and their four attacks (and S5 on the charge), Stalkers, who splice Carver special rules onto a Marauder-like body, and ranged support with Murderers who compensate for their mediocre BS with more firepower than the Rak'Gol's mostly sub-par ranged weapons allow for. Their ability to fire Heavy Weapons on the move at full ballistic skill keeps them in the fight against shootier teams. 


Rak'Gol can even bring their own psyker, the Techno-Shaman, into the fray. Depending which psychic power you give it, it will be able to put a dent in large clumps of infantry, give your models the ability to ignore damage, or even copy your enemies' weapons. The presence of Techno-Shamans also powers up the last Rak'Gol special choice, Technobominations, who are normally mediocre (if very tough) fighters but become much more capable around a Techno-Shaman.


In addition to their namesake Blades, Rak'Gol have access to a large selection of melee weapons, allowing you to easily equip your models to make short work of almost any threat, especially when falling upon them through ambush. On the flipside, they combine a Space Marines-like model count with a guardsman-like BS of 4+, and a mediocre ranged arsenal means that they will usually be outclassed in a firefight, no matter who the foe, so make sure to put the shooting you get to good use. For instance, the Razor Gun is only Strength 3, but its three shots at 24" can re-roll failed Wound rolls against Infantry, helping you take out specific targets. Similarly, the Rad-Beam Cannon might "only" have a Strength of 7, but not not underestimate the potential of a 36" melta weapon!

As a Rak'Gol player you have access to a good amount of unique Philosophies and Tactical actions. Your Philosophies will reward having a battle plan in advance, such as Terror Incognita, which grants +1 TP as long as you give up the ability to use any tactical actions other than those unique to the Rak'Gol. As for these tactical actions, they help to ensure that you ambush the models you want to, thanks to the ability to deploy closer to the enemy, or improve your ranged ability by increasing the number of shots for your most basic weapons.

The Rak'Gol might be strong ambushers, but they are not without their weaknesses. They lack model variety - only Technobominations are not Infantry models, and even they do not move any faster than the rest of the army. In addition, the Rak'Gol are quite vulnerable to being ambushed themselves: if they fail to reach their targets, or if they kill their target and become stranded on the battlefield, you will have a hard time reaching the rest of the fighting while you get shot down with ranged fire. As a Rak'Gol player, you are something of a one-trick pony, but you are very, very good at that one trick. It's also easy to lose yourself in the amount of upgrades Rak'Gol have access to and to end up with not enough models to do the job. Kit your team appropriately, pick your targets well and overwhelm the enemy with brute force before they can strike back.


No models? 

The biggest obstacle to playing Rak'Gol is their lack of models and unique appearance, which means you are going to have to either proxy the models or do extensive conversion work in order to create your kill team. Your best bet for that is to tinker around with Tyranid and Skitarii parts, as well as the more Covenly aspects of the Drukhari.

 Of course, if you just want to try them out for yourself, programs like Tabletop Simulator will be more than happy to help you without having to invest in difficult conversions.

Know Your Enemy: Ash's Court Of The Dracon

$
0
0
Welcome to the first Know Your Enemy! While our new edition is still well, new, we thought it would be a good idea to give some insights into how the team behind the game play H8R. Many of the teams we'll showcase in this feature have been brought more or less directly across from HoR7, but this creation of Ash's is brand new for 8th edition. Don't let them take you alive...

When the Drukhari appeared for 8th edition, the Court of the Archon models immediately caught my attention. Single-model units of multi-wound badasses, hand picked by their despicable crime boss? Yep. I thought they'd make ideal candidates for a thematic kill team, so I set out to build my own versions of each, and then basically see what points I had left over...

The Kabal of the Lateral Thorn's "Diplomatic Envoys"

Let's start with Dracon Espina. She rocks a blaster, because at T3, 1W and no Shadow Field, she's not the best candidate to fling into melees. We keep her out of the way. The Obsidian Stone mounted in her helmet lets her attempt to deny a single psychic power in the enemy turn, a valuable piece of kit in an Opus that doesn't contain a single psyker! A Gloom Field gives a degree of protection from shooting attacks for her and her cronies, as long as they stick together. She also has a Phantasm Grenade Launcher which almost never gets used, purely because the list is 247 points without it. Lastly, the Archon's seal increases her Inspiring Presence out to 9". That comes in useful for the next bunch of villains...
Dracon Espina, First Trueborn of the Kabal of the Lateral Thorn

Ur-Ghul, Lhamaean, Medusae, Sslyth.

All of these guys get to reroll all of their Hit dice if they're inside Espina's boosted Inspiring Presence, so that's neat. They can all attempt to defend her from attacks, and the Sslyth does it best of all. Since Espina is a Kabal of the Lateral Thorn leader (as opposed to a Wych Cult or Coven of whatever leader) I can choose to take any of these guys as Core. I nominated the Ur-Ghul, her personal pet, and let the rest be Specials for better campaign survivability and the TP I'd get from filling my Specials section.

Espina's pet genestealer, with skinplanted chain and mind-shackle. Plays as an Ur-Ghul.

Lhamaean Ilex disdains the cult's usual trappings of exposed flesh and fluttering lashes, preferring the stark beauty of the kill.

The Medusae called Goire is a self-styled wizard. No true psyker, his powers flow not from the Warp but the brain parasite he carries.

Eydouxii's serpentine body provides terrifying strength and a shocking turn of speed.


The team features two Hellions from the Blizzard that Bites, a small gang of violent criminals-cum-smugglers who Espina hires from time to time when she needs a turn of speed on her side. These are my only other Core models. The ability to more or less choose their combat drugs is lovely. I normally take the Toughness boost, or the Strength one. In certain matchups though, neither are useful. Fire Warrior Tau are a prime example, where increasing Toughness from 3 to 4 means nothing against S5 weapons, and similarly, augmenting their strength from 4 to 5 wouldn't make any difference against T3 enemies. In these cases I'd take Hypex for an extra 2" move. Combined with their ability to fall back, shoot and charge, it lets these nutters cover ground like nothing else.


"Bring me their heads!"


Finally we have a pair of Trueborn, one of them sycophantically copying Espina by bringing her own (rather small) blaster. Great against pseudo-monsters, sentinels and most enemy leaders, the left-right punch of two darklight weapons doesn't often leave much behind.


To ice the cake, let's have a look at the Tactical Point potential of the list. We get:


  • 1 for having a leader. Ka-ching!
  • 1 for having a full infantry list. Another easy one, although playing without Reavers still feels weird.
  • 1 for filling up my Special section. The ability to take Court models as Core frees up as many spaces as I want, essentially, but I only needed two Trueborn to get that second blaster. (I actually only needed one, as the Dracon counts, but there's not much else to be done with the points.)


So that's a modest 3. I favour the "Keep Them Guessing" philosophy for an extra 2. With the Drukhari and rulebook stratagems to choose from, I've got more than enough tricks up my sleeve to adapt to the evolving battle without having to repeat myself.

Some notes on the models.

If you're interested, the Ur-Ghul's mind-shackle is made from a Reaver jetbike handlebar piece. His wrists are deliberately swollen and bruised, as the chain was implanted under his skin by wrapping thin strips of green stuff around his arms and building the chain directly into it. The chain links are superglued to stop the paint rubbing off as it moves. 

The Lhamaean's mail skirt and torso comes from an old dark elf spearmen kit, and her scarab beetle base is from Element Games.

Espina's blaster is a dark lance with the thin barrel chopped off. Super easy conversion for a nice oversized blaster! The skull at her hip represents the Gloom Field projector, and the back banner her Archon's Seal.

The Sslyth took a bit of work. His body is a daemon prince tail, his torso is made from two Cold One Knight torsos placed butt to butt, and fitting those things together took a bit of green stuff work. He has a Scourge head just because I thought it looked cool. His weapons are from Flagellant, Cold One Knight and Scourge sets, with an arm from the old Dark Elf spearmen and a holstered pistol from some Dark Eldar Warriors from the 90s. Couldn't resist.


Thanks for reading! If you have a beloved team you'd like to share with us, get in touch at the Facebook group for the blog or community. Happy Heralding.

- Ash

Power From Paint #1: Painting yellow the easy way.

$
0
0
Welcome to the first Power From Paint!

We got Greg, the dominatrix of Hive Fleet Bombus, to show us how to achieve that buttery yellow skin that nobody really believes is easy, now matter how often he tells us it is. This technique works particularly well on skin, fabric and other natural surfaces, but is perfectly easy to apply to power armour, vehicles and the like.

Without further ado, here's Greg to enlighten us all on a fast, pain-free way to paint yellow!

First, prime your model white. Don't rush it - good priming is key to this whole technique. Get a primer you trust, and don't spray unless conditions are perfect. Not too hot, not too cold, not too humid. 


Next, give all the yellow areas a light wash of Casandora Yellow. Going over a smooth coat of white primer, a light wash is all you need for a pale yellow base. Let it dry, and decide whether you want to enrich the colour further with a second light wash.


One wash
Two washes
After waiting patiently until your washes have dried, grab your Yriel Yellow. Take a moment to appreciate the irony of painting Tyranids in the colours of their greatest enemy, and give the yellow areas a good heavy drybrushing all over. This, as you know, gives depth to the shaded areas and efforlessly picks out all the natural lumps, bumps and grisly bits. 


After drybrushing
 Note that by "heavy drybrush" we don't mean "put more paint on your brush" - that will only lead to paint finding its way into recesses where it shouldn't be. You still want next to no paint on your brush, just persevere a bit more than usual to get every last bit of pigment onto the model. 

The finished article
That's it! Then it's just about picking your complimentary colours and finishing up. Yellow horde armies impossible? Who says?

Steel Brain vol 1: Team Building - Weaknesses And Why They Don't Matter

$
0
0

Good evening players, and happy Red Stuff And Hearts day. This one's for the lovers, or the crazed dismemberers, as you prefer. Today we're looking at building your team, and why you shouldn't worry about what it can't do, but instead should focus on what it can do better.

You're Expecting Too Much

Heralds of Ruin Kill Team is truly a game for all-rounders. The day before, your band of miscreants had to take down a rampaging monster the size of a battle tank, taking care to outwit the Grey Knight Terminators as well, and now you're sneaking through a city on the verge of civil breakdown, fighting local gangs and the opposing swarm of cultists all at once. And now there's a live nuke/Gellar field breach/zombie infestation to deal with. Fantastic.

With a 250 point limit for most games, how are you supposed to make sure your team can cope with these varied challenges?

The key, is balancing specific strengths against an all-purpose playstyle. You need to be able to take on anything, but if you build too general-purpose a team you won't be good enough at doing a particular thing to win at all. You need to decide what you want to be good at, and be really good at it, but without investing so much in that thing that you can't cope should a situation call for a different approach. 

That's not an easy task without experience, but we can and will break it down. Beneath the foam art of bewildering choice awaits the hot latte of truth.

Finding Your Keynote Killer

Picking a unit to build the team around is a very good start. For this exploration, we'll start with your Team Leader. The Leader is usually a decent place to start because, to some extent, your choice here will open up some options and shut off others. Often it will influence your Core choices, perhaps allowing certain Special models to be taken as Core or access to greater numbers of a certain unit, and will almost certainly count towards one or more weapon/wargear allowances.

Let's build two teams at once, just for a laugh. We'll choose a Craftworld Eldar Warlock Skyrunner and a Chaos Daemon Changecaster. 

Once you know what kind of leader you have, you've got a better idea what the team will be doing. At this point, you've just chosen the Leader unit with basic wargear. Shiny bits come later! 

Our Skyrunner is a fast-moving unit capable of boosting pretty much any element of her team, be it speed, survivability or lethality, with psychic might. Her jetbike gets her where she needs to be quickly, and she's on the expensive side. She'll therefore need some measure of protection, and some powerful units that her magic can turn into absolute monsters. With only one power per game though, we'd better choose carefully. 

Our Changecaster is a Psyker too. It's slower, with three powers in hand compared to the Skyrunner's one, but still only casts one per turn. It's not as tough, but has a better invulnerable save. The combination of infantry speed and a good choice of powers makes this Leader ideally placed for hanging back and controlling the state of the board.

Cleared For Takeoff

Now we're moving! Our craftworld team could still be about a few different things at this point, but let's commit to something and take some more jetbikes. This is going to look sweet. Rule of Cool is definitely a big part of roster building. A quick look at the Windrider and Shining Spear entries shows we're limited to a maximum of 3 of each, and that Saim-Hann Windriders have better weapon access. Hold that thought. 

We don't yet appear to have a specialty, besides incredible speed which helps with objective grabs if the mission calls for that. Not all of them do, so that's not good enough. Let's say what we really want is a solid Alpha Strike list. For my money, that's Shining Spears and the Quicken/Restrain power (heavy emphasis on Quicken). 

So - Warlock Skyrunner + 3 Shining Spears, not forgetting wargear, comes to 178 points. We're looking at 10 T4 Wounds and a devastating laser lance charge which, thanks to Quicken, is almost certainly going to happen in turn 1. (By the way, why not Shining Spear Exarch? In short, Expert Hunter is useless in HoR outside of specific scenarios and the psychic power of the Skyrunner is well worth the extra points.) 

What Is It Good For?

Back to the Daemons for a minute. Our Changecaster isn't going to be moving much, so why not take advantage of that to boost its Daemonic Rituals?  We've got some Armoury items to do the business, and I'm going to ignore my own advice and pick two of those right away: the Well of the Warp and the Transpicuous Orb. The Well allows us to dictate the ebb and flow of our own forces, as any daemons arriving on the battlefield can choose to climb from its depths. The Orb is a great late-game tool for bringing reinforcements when they're needed most. 

At 98 points, that's quite enough on the Leader. Or is it? For a mere 2 points more, we fill the requirements for Herohammer and get another Tactical Point. Why not. The Staff of Change takes it to 103 and gives Smite the range of a boltgun. Not bad.  

Now we need some backup! Our Leader is a Locus of Tzeentch, but isn't likely to be too close to any combat, so that probably won't matter. For a cheap, fast moving, extremely threatening backbone to this team, I humbly present the Daemonette. 7 points a piece. Let's take 10. 15 is tempting for the Flurry of Claws ability, but keeping all 15 alive long enough for it to work is unlikely, and therefore something of a waste. An Icon works extremely well with the Well (well, well...) and an Instrument keeps them moving as they should.  That brings us to 198 points. 

Craftworld Would Be A Great Name For A Yarn Shop

Our Craftworld team now fulfils our first condition nicely; it's really good at a melee-focused alpha strike. Such clear strength comes with a clear weakness, namely a low body count and next to no ranged firepower. We also have no Core units, which is a problem. Now's the time to think about which Craftworld we might be from. Saim-Hann is the obvious choice, as either the Opus or Codex trait would serve them well, but you might think about Il-Kaithe to get some Imperial Core choices (only three though, so this probably isn't the way to go) or Malan'tai Before The Doom for a 36" Turn 1 move for all your jetbikes, assuming Quicken goes off. 

We don't really need another 2" of movement, though Malan'tai's Seize ability is nice, and I don't want to dig into yet another Opus, so we'll go Saim-Hann, Opus flavour. Being able to forego fall back + shoot for fall back + charge fits the Spears beautifully. It also allows us to take a single Windrider as a Core choice and give it a Shuriken Cannon. Since we're not using the Codex trait, the Scatter Laser would be hitting on 4+, which isn't really good enough for a team this small. There's some thematic ranged power for you, anyway. 206 points total. Let's finish this off. 

At this point we're looking to further bolster our strength or mitigate weaknesses, and it's a good time to look at the Armoury and Tactical Actions available to us. Our Warlock won't be seeing much combat, ideally, so the Leader Only relics aren't for us. As our bikes are likely to run close together for maximum psychic power impact, avoiding Nerve tests would be good, so the Runes of War are a sensible choice. 

Since the Runes extend as far as our Warlock's Inspiring Presence, it makes sense to make that bigger with an Autarch's Seal, and finally buy a single Ranger.

The threat of even one sniper on the board shouldn't be underestimated and can play havoc with your opponent's plans for their Leader. We'll return to sum up the Eldar in a minute, but first, Daemons.

The Daemon Is In The Details

Our Daemon team is looking a bit weird at the moment, with a sizeable melee force and a Leader who's up to the task of buffing, killing and most importantly, summoning reinforcements, but isn't particularly scary in its own right. They're still very vulnerable to sit-and-shoot teams, as are all Daemon teams, so let's see what we can do about it with our remaining points.

Two bases of Nurglings can put early pressure on an enemy, deploying right on their doorstep and maybe even getting some lucky charges. These 36 points are strictly sacrificial, and their value should be counted in enemy shots that don't find your other models! 16 points remain to us. We could throw another two lesser Daemon bodies into the mix, or peep at the Armoury again. The Localised Warp Storm looks good - a single turn of protection from shooting will make your opponents think twice about attacking your Leader, and give his plans time to come to fruition. Most factions have access to this in some form (smoke grenades) but few can wield it with no downsides like a firepower-devoid Daemon team can. Add a single Pink Horror for some tricksy business, and we're done!

Now let's look at what we've come up with.

CRAFTWORLD AELDARI - SAIM-HANN (OPUS) - ALPHA STRIKE

Leader

Warlock Skyrunner (85)
Autarch's Seal (10)
Runes Of War (5) 
Quicken/Restrain (obviously you should choose the right power for the game, but this will serve you well most of the time)

Core

Windrider (23)
Shuriken Cannon (10)

Ranger (20) 

Special

Shining Spear
Shining Spear
Shining Spear (93)

246

Tactical Points: 4

Destined for Greatness +1
Death and Diversity +1 (this one is incredibly easy for Craftworlders to get)
Herohammer +1 
Philosophy: The Skeins of Fate +1 (This is just a suggestion, of course. 4TP with the ability to regain 1 or 2 is pretty decent, but this team shouldn't require a lot of rerolls or shenanigans like some others do) 

Battle Plan

Warlock, Spears and Windrider should deploy forward and hidden where possible, and ensure the 3" area of effect on Quicken catches all of them. Move aggressively, cast Quicken to catch everyone. Reroll as needed, it's important this power works! The Spears move again for the charge, the Windrider and Warlock may go where they need to to find appropriate targets/provide the Distortion Field buff. 

Ranger and Windrider should prioritise targets to facilitate the Spears' charge - try to trigger Nerve tests, remove strong auto-hitting weapons, etc. A well-aimed initial charge should remove the head of the enemy team and leave them fighting to catch up, while your Wild Host can essentially do as it pleases even after falling back from a combat.

CHAOS DAEMONS - MULTI-GOD - BOARD CONTROL

Leader

Changecaster (78)
Staff of Change (5)
Well of the Warp (10)
Transpicuous Orb (10)
Localised Warp Storm (8)
Bolt of Change, Gaze of Fate, Smite

Core
10 x Daemonette (70)
Icon and Instrument (25)

2 x Nurgling Swarm (36)

Pink Horror (7)

249


Tactical points: 6

Destined for Greatness +1
Mind the Boat +1
Herohammer +1
Death and Diversity +1 
Philosophy: Keep Them Guessing +2 (we've really tried to maximise our TP here, as you'll see)

Battle Plan

Nurglings set up to Make Mischief. Daemonettes take forward positions but cover where possible. They're fast but fragile. The Changecaster should be fairly far forward and as hidden as possible, with the Pink Horror 6" behind it and able to keep up. 

The Nurglings and Daemonettes have very obvious roles here, so I won't labour that. The little Tzeentchian duo have some tricks up their many sleeves though. Observe...

Turn 1. Both the Changecaster and Pink Horror move forward as fast as they can while remaining 1. Out of danger and 2. Within 6" of each other. Surge of Unreality (2TP) can be useful here. Psychic powers as neccessary. No Ritual. Consider using the Localised Warp Storm.

Turn 2. Get the Changecaster into a good position to drop the Well - look for objectives, enemy spawn points or weak flanks. Move the Pink Horror to prepare for Turn 3, and keep it within 6" of the Changecaster. No Ritual. Another good time for the Localised Warp Storm if you didn't use it yet. 

Turn 3. Use Devious Deviants (2TP) to switch the positions of the Horror and Changecaster to bring the Leader to safety. This isn't a Move and does not prevent a Ritual being attempted. At this point you ideally want to be attempting a Ritual every turn, using the Orb on a later turn to minimise the risk of a waste, and the Incursion Instigator action (1TP) at a key time if needed. 

Your Daemonettes and Nurglings will be doing their thing by now, your enemies concerned with them, and you can continue to build your board presence with Rituals and Bolts of Change to bring in as many reinforcements as you can. It's a far less reliable and obviously powerful strategy than the Saim-Hann one, admittedly, but after playing it a couple of times most opponents will still be at a loss as to how to counter it, and teams with such good board control led by such an optimised Leader are rare indeed.

Summary

Hopefully I've managed to show how a team doesn't have to be good at everything to succeed. A fast Aeldari team largely without fire support can mitigate that weakness by playing even more into its strengths, to ensure the enemy isn't at range for long. A numerous but fragile Daemon team can play to its strengths by tying up the enemy with numbers and distractions while it reinforces itself.

By contrast, a smaller team of tougher daemons without that ability would probably give a mediocre performance at best, while an Eldar team that tries to compete in all arenas of battle might outclass its opponents in individual duels, but would soon find itself brought down by weight of dice. By throwing most of its points into doing outstandingly what it can already do quite well, a team takes on a power and a narrative that outstrips any typical jack-of-all-trades enemy and feels awesome to play.

Join us next time (whenever I find the right combination of coffee and spare time) for a look at optimising your team's growth in a campaign!  

Star Wars X-Wing Miniatures Game Review

$
0
0

Introduction

I finally managed to get my hands on the Star Wars X-Wing miniatures game by Fantasy Flight Games. It's been pre-ordered for a long time, and OG Games have now managed to get stock from across the pond. For those who have been living in an exogorth, here's the official blurb:

Control the most advanced starfighters and outstanding pilots in the galaxy! In X-Wing Miniatures Game, you take the role of squad leader and command a group of merciless Imperial or daring Rebel pilots in furious ship-to-ship space combat. Featuring stunningly detailed and painted miniatures, X-Wing recreates exciting Star Wars space battles from small engagements of only a couple of crafts, to large conflicts where multiple squadrons clash. Select and equip your ships, pick your crew, plan your attack, and complete your mission.Taken from the FFG Site.

The first thing I'll say is that I love Star Wars, as if you didn't already guess from my internet handle. I was the kind of kid that ran around the woods with his mates and bashed the crap out of each other with plastic glow rods screaming the star wars theme. So as you might imagine, I had steep expectations.

In this review I'll talk mostly about the Core Set and its out-of-box gameplay, with only a small section on expanded play (as I only have two expansions currently).


Opening The Core Set

As with any other FFG game, you get an overwhelming number of components! The box provides all the movement templates, action and status tokens, range rulers, asteroids, mission counters, dice, cards and miniatures (two TIE Fighters and a single X-wing) you need to start playing. The only thing you have to provide yourself is a 3' x 3' gaming surface - I just used a square of black fabric from Hobbycraft, but it would have been nice if they included a play sheet or fold away board. Anyway, all of the included bits and bobs are printed on high quality card stock and feel as though they could handle some serious use. I was particularly impressed with the artwork on the cards and templates as they really give off a Star Wars 'feel'.

Star Wars X-Wing Miniatures Game - My Ships

The ships themselves look like they came directly from the ILM archives, and are highly detailed. The models are adequately painted to gaming standard, and to be honest I probably won't even touch them up - although I may add Rogue or Wraith squadron markings at some point... but that's purely to satisfy my nerd cravings. The scale is just right, not too big to interfere with gaming and not too small that you can't see the details.

With all these components X-Wing initially seems to come across as a bit of hybrid game. Part miniatures, part board game. You can buy the Core Set and set up a game in minutes (once you've read the rules) using the pre-generated pilots and missions, just as you would a board game. No assembling and painting models beforehand. Of course you only get 3 missions in the rulebook so this approach may get tired fast. On the other hand, if you want to go deeper and craft your own squadrons (like a traditional miniatures game) you can - which I will cover later.

X-Wing Miniatures Game - Core Set

Another thing I wanted to say was the box itself is actually sturdy enough to hold your bits. I have two expansions and their plastic 'cradle' (for want of a better word) sits nicely inside with enough room for everything else. I've used resealable bags to store all the components and the rulebook sits nicely on top. This is a nice touch as the game can sit on a shelf with the rest of my board games, I don't have to buy any additional storage like I do with my other miniatures games and find a place for it.


Playing the Game

As a space miniatures game I was expecting pages and pages of rules (like Battlefleet Gothic), but was surprised when the rulebook turned out to be just under 30 pages, and only about half of that is actual rules. You can read the pdf, or watch the tutorial video on the FFG site so I won't go deep into the rules, rather give my overall impressions.


X-Wing is simple and easy to learn. The book is very well laid out and takes you through the game step by step. The game uses templates in order to determine movement and range, and custom dice for combat. Something I actually rather like and makes movement and combat a lot quicker with less contention. You don't have to look at any charts to see what effect your roll had on the game - it's already right there on the die face.


I also really like the 'hidden manoeuvre' aspect of the game, where you have to try and out-guess your opponent in where they will be moving next - with different ships having different manoeuvring capabilities. The combat phase is totally reliant on your movement (through firing arcs) so it adds a heavy dose of tactics to quite a simple game mechanic. With most ship stats being similar, manoeuvring well and outguessing your opponent is what will win you games. Another thing to add is that the rounds fly past, this game is so quick! With most of the decision making done simultaneously, both players have something to do at all times - none of this twiddling your thumbs for half an hour while your opponent moves and picks off your army.

X-Wing Miniatures Game - Game In Progress

I've played a number of games with my fiancée now (a non-gamer) and she picked up the rules after only two games. She even said she had fun, something she has yet to do for any other miniatures game I force her to play! I personally would have liked a little more detailed rules (being a seasoned miniature gamer), but the game is very quick to play and there isn't anywhere that says I can't make up some extra rules myself! You never know, they may being out an Advanced version some day.

X-Wing Miniatures Game - Game In Progress

Squad Building and Expansions

Where X-Wing diverges from its board game roots is the ability to build and upgrade your squad. Like all good miniatures games it uses a points system for ships and upgrades, with 100 points being typical. You can load up on ships with elite pilot skills, missiles and modifications, or go with lots of ships with fewer upgrades, or you can find a nice balance. As I only have two expansions (about 50/60 points a side) I can't say how playing a 'full' 100 points game would effect the rapidity of play, but as the rules are so simple I doubt it would have too much effect.

An example Rebel squadron from the FFG site.

One bad note I have with this is that instead of giving you all the upgrade and pilot options from the start (such as a Codex), the upgrade and pilot cards come packaged with different expansions. This means that the only way to get all the options is to buy everything (as most upgrades can be used by both Rebels and Imperials). This annoyed me a little with one of my favourite SW characters Wedge, as instead of being able to buy two starter sets (and thus grabbing 2 X-wings and 4 TIEs) I'm forced to buy the X-wing expansion if I want to use him. But I suppose that's business.

Of course the main reason for buying expansions is the miniatures, and FFG are bringing new ones out all the time. The larger ship expansions also come with new rules and missions. I can't wait to get an Interceptor, piloted by the famous Soontir Fel of course! May have to paint the rest of my Imperial squadron with red stripes then.


Cost

I bought the core set for £25 from OG Games and expansions are around a tenner (of which you'll need about 2-3 per side). So a 100 point squadron will cost you around £45-55 if you're only collecting one of either Rebel or Imperial. Which of course no-one will! So it ends up being more like £75. That's a lot of money, but a new army from GW costs over £300 for each player not including things likes books, paint and other paraphernalia  When you take into account that £75 gives you everything you need for 2 players to play a decent sized game, its a bloody bargain!

X-Wing Miniatures Game - Game In Progress

Conclusion

If you love the movies, love the books, there is no way you won't like this game. The miniatures, the art, the characters, awesome. To be honest, even if you're not a Star Wars fan I would recommend it. I wouldn't replace my regular more-in-depth miniatures game with it, bit X-Wing is great for light evening entertainment. The models are of high quality, rules are tight and quick to learn, and if you can resist making 'pew pew pew' and 'froooom' noises while playing then you're a better man than I.

Darth Meer

P.S. You know you want to play it with A New Hope playing in the background.

The first Terran Classic - A tournament report.

$
0
0
Hey there heralds!

If you were wondering how the first ever international Heralds of Ruin tournament went down, head over to the blog at JustPlay for my report. It's here.

Yeah, it's late.

Blame this guy.


Back with more soon!

Ash

Markerlight #2: Jonas Kortner

$
0
0
Heralds, please provide your full attention while the second issue (episode? Edition?) of Markerlight illuminates today's subject...

Jonas Kortner is here with a stunner of an Inquisition team. Go nuts!


The origins of this grim, dark team? Jonas participated in a small, friendly tournament rewarding secret and original lists, an idea I really enjoy. 

Points were awarded for building a team specifically for the event, in secrecy, and doing something completely different from one's established collections. Points were lost when other players correctly guessed one's team in a competition prior to the day!


You know what they say about expecting the Inquisition. Smart move...

Jonas, a die-hard Chaos player, wanted something entirely antithetical. Also having a ridiculous backlog, he promised himself to spend less than NZ$100 on a playable team. Ordo Malleus & GK, allowing very minimal model counts, ticked all the boxes. Eventually he got away with a box of GK paladins, a small trade, and bits from the box.

"When I wanted a more unique colour scheme for them, I found inspiration in the Red Hunters chapter - they're red and bad-ass and associated with the Inquisition. I've little idea if they actually have aegis armour ...  but now it seems they have at least three suits."


While Jonas works on updating the list to 8th edition HoR, check out the team in some more detail, and we'll see you on the next Markerlight!

If you want a team this cool, the Inquisition rules for Heralds of Ruin are right HERE.


Viewing all 74 articles
Browse latest View live